
Apple Cinnamon Bread
Helloooooooo
School has been alright so far. ODAC has been quite good as well. I have been struggling with my studies. I always thought that I don’t have time for my tutorials, but turn out I am just procrastinating. hmmmm. Studying is surprisingly quite enjoyable for me.
However, what I really enjoy is baking after all. Spending 1hr kneading the bread was more enjoyable, and therapeutic as well. There were many times when I felt like giving up because my arms were so sore but I have to continue, because if not, the bread will fail. Sounds like life right? Haha!
I really really love this bread and this is one of my favourite bread now. It has the texture of those bread which I have bought outside from those bakery. I was elated and exhilarated!
Other than making this apple cinnamon bread, with the same dough, I made mixed berries bread. Omg. That bread is insane. The whole bread was sticky with the juices that were running from the mixed berries. There were no jam but it tasted as though there was jam. It was not overly sweet because minimal amount of sugar was used to macerate the berries. It was heavenly. However, because they were too soft, I couldn’t take a picture of it, but no worries! I will update you guys soon!


Speaking about this bread, the filling was delicious (Without the apples lol). Without the apples, it was just cinammon sugar butter filling. Its simple because it was so good. I love this combination. Why without the apple? because the recipe I got tasked me to cook the apples in butter only. I guess this is the reason why the flavours of cinammon wasn’t absorbed into the apples. Hence, the apples were flat in terms of flavour.
I made some adjustments to the recipe I got. The bread is mainly 90% adapted from Christine’s tangzhong paibao! After making this bread a few times, I found the perfect ratio to obtain such soft bread.
Here’s the recipe!
For the Tangzhong:
25g bread flour
125ml milk
For the bread:
270g Bread flour
80g All purpose flour
20g Corn Flour
12g Milk Powder
5g Salt
65g Sugar
6g Yeast
120g TangZhong
110ml Milk
30g Whisked Egg
1 large egg yolk
75ml evaporated milk
28g condensed milk
35g softened unsalted butter
For the filling:
1 medium apple
25g butter
1tablespoon cinnamon
50g brown sugar
Instructions:
1. Whisk the bread flour and milk for the tangzhong. Heat it in the microwave for 40s, stir, 40s and stir again. It will be really thick, whisk vigorously to loosen the mixture a little. Leave it aside to cool.
2. Combine all the ingredients except butter for the bread together and start kneading! It took me about 45mins by hand to knead till windowpane. Bread will be quite sticky. When all the ingredients are mixed together, incorporate the butter small pieces by pieces till windowpane is reached.
3. Let it rise in a warm place for 1.5hrs or until it is doubled in size.
4. Punch down the dough and divide the dough into 4 large portions.
Make your filling: Microwave all the ingredients needed for the filling till apples are soft 🙂
5. Oil your rollling pin and your hand (for easier handling of the dough).
6. Roll out the dough until it is 0.3cm thick.
7. Spread your filling. Start rolling from the long side. Once you have a long log, divide the dough into two and start twisting it as though it is a babka.
8. Place it in the tin and let it rise again (this took me another 1hr)
9. Preheat your oven to 180 degrees celcius and bake it for 15mins.
Okay thats it! Enjoy!

Opera Cake
Hello everyone!
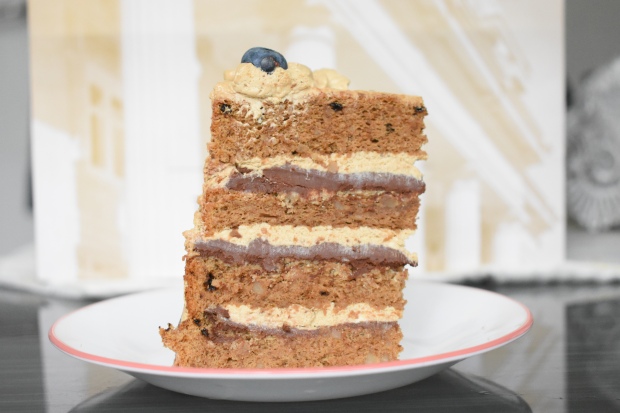
I am going to share with you a recipe today! It’s one of my favourite and of course, it tastes absolutely delicious. As you all know, opera cake consists of sponge cake, chocolate ganache and buttercream. Yep, thats the component of my cake.


I got this recipe from butter and brioche’s opera cake and you can head over to her blog to take alook. Her recipe comes from ‘Layered’ cookbook, which I really want but I dont have the money to purchase one. 😦
I followed her steps pretty well just that I used walnut meal instead of almond meal and that my walnut meal was not as fine as it should be. However, it became a blessing in disguise. The bigger chunks of walnut added a whole new level of texture to the cake, providing some crunch and make the cake more enjoyable. It’s an unexpected crunch. 🙂
As for the buttercream, she used a buttercream made with egg yolks. However i lost my candy thermometer hence I couldn’t measure the temperature of my sugar syrup, which resulted in a super watery buttercream which actually tastes good. Of course, I didn’t use it and used the heavy cream+cream cheese frosting. It’s my favourite frosting and I really really love it. It’s creamy and light at the same time, and most importantly, not as sweet. It doesn’t have the oily feeling when it melts in your mouth. One word: delish.
As for the chocolate ganache, I have used 85% Lindt chocolate which made it really dark and delicious. Of course, it’s not sweet and have the hint of bitterness to it which is really really really addictive.
Overall, the whole cake is not sweet at all. If you are craving for a sweet cake, this is not really for you because the coffee flavour is well-expressed and together with the dark chocolate, it’s perfect with a cup of coffee.
So here’s the recipe!

Citrus Mousse Cake
Hello Everyone!
It has been so long since I last blogged. School has just finished but I have been helping out at parent’s pizza shop so did not really have the time to blog. But… today, I am going to share with you this glorious citrus cake.
Be prepared. There are a few elements to this cake but it all comes together quite easily. I considered this cake to be quite easy to make. I felt really happy when i made this. The flavours combination are one of my favourite.
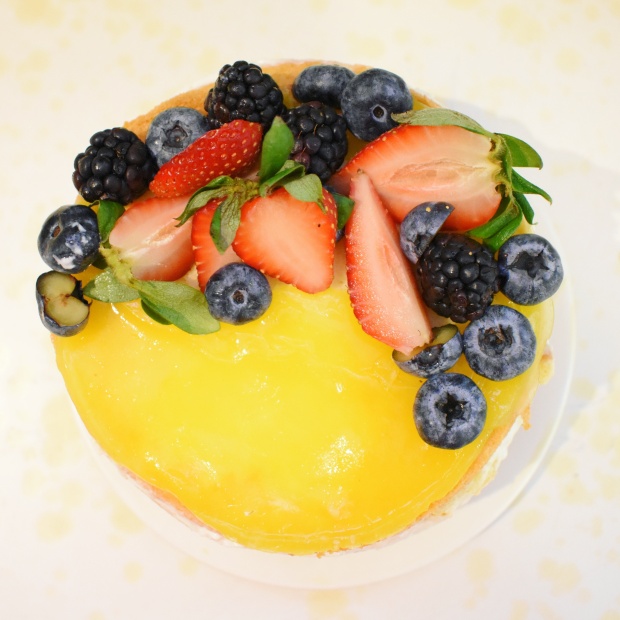
Passionfruit. Orange. Blueberries. Strawberries. YUM!
This whole cake is so light and refreshing and you can’t help but to take the second slice. The third slice. The fourth slice…. *Nobody knows*
The cake comprises of an orange sponge cake (oh gosh. This is so delicious). Cheesecake mousse (It is airy and super duper light, plus there is no egg yolks involved!), blueberry and strawberry compote (I just love berries) and passionfruit curd (tangy tangy baby), and an orange agar layer.
If you are looking for a sweet cake, while… This is not for you. It is not the slightest sweet, and I think it may tend a little, just a little bit to the sour-ish side because of the orange agar layer which is a tad sourish, but I think its alright. LOL


Okay. Enough of talking. Here’s the recipe!
For the orange sponge cake (makes a 6inch cake)
3 large egg yolks
35g oil
50g orange juice
45g cake flour
Pinch of salt
Zest of one orange
3 egg whites
50g sugar
Method:
1. Line the bottom an 6″ round pan. Preheat oven to 160C
2. Beat egg yolks, oil together until combined before adding orange juice and zest.
3. Stir in the flour. Ensure
5. Beat egg whites on medium speed for 2min. Continue beating while gradually adding the sugar and beat at high speed for another 2 minutes. Beat till soft to firm peaks but not stiff.
6. Fold in 1/3 of the meringue into the yolk batter with a hand whisk. Add another 1/3 and fold until almost combined.
7. Pour into prepared pan and bake with a water bath at 160C for 40-45 minutes (Mine took 40minutes) or until cooked. (What I did was to fill up cupcake mould with water and place the prepared pan ontop of the cupcake mould)
8. Remove from oven and let it cool down. 🙂
After you are done with the cake layers, move on to the passionfruit curd.
25g passionfruit (More if you like it to be more tangy)
18g butter
25g sugar
1 egg
method:
1. Place passionfruit and butter into a saucepan and heat it till it is bubbling.
2. Whisk the egg and the sugar together in a heatproof bowl.
3. Slowly whisk in the passionfruit and butter into the egg and sugar mixture, slowly tempering it. Whisk vigorously so as to prevent the egg from scrambling.
4. Cook the curd using bain-marie.
5. Stir it occasionally to prevent the bottom from getting too overcooked.
6. Once it starts to thicken, remove from the heat.
7. Place a clean plastic wrap over the surface of the curd to prevent a skin from forming.
8. Let it cool completely before using.
After the passionfruit curd is done, move on to the blueberry/ strawberry compote.
1. Puree 110g of a combination of blueberry and strawberries with 15ml of lemon juice, zest of half a lemon and 40g of honey.
2. Pour it over a saucepan and cook till its boiling
3. Meanwhile, bloom 4g of gelatin powder over 80ml of water.
4. Once the blueberry mixture if boiling, remove from heat and stir in the gelatin. Whisk till all the gelatin has melted.
5. Add 115g of blueberries to the mixture.
6. Let it cool.
Cheesecake Mousse
112g cheesecake
30g honey
Juice and zest of half a lemon
35g milk
3.5g of gelatin bloomed in 30ml of water
Method:
Whisk cheesecake and honey till it is light and fluffy.
Microwave the milk for 2 minutes till it is steamy. Whisk in the gelatin and stir till it is smooth.
All the gelatin/milk mixture into the cheesecake and honey mixture.
Stir is the juice and the zest.
Whisk till it is completely smooth.
Orange Jelly:
75g orange juice
1g agar
Whisk the orange juice and agar together.
Microwave for 3 minutes till it is nice and hot.
Strain it immediately. (it sets almost immediately!)
Assembly:
Put an acetate over the 6inch cake pan.
Divide the cake layers into 3.
Place the top layer (the layer which has abit of cracks) on the bottom.
Spread all the curd over the cake.
Pour 1/3 of the cheesecake mousse over.
Place the blueberry compote over the cheesecake mousse.
Top it up with 1/3 of the mousse.
Place the second cake layer over it.
Top it up with the remaining mousse.
Place the last cake layer over.
Place the jelly on top of the cake layer.
Enjoy 🙂
There you go! Cheesecake mousse cake. Yumz!
ODAC HANDOVER VIDEO

Red Velvet Cupcakes
Helloooooo everyoneeeeeeee
It’s one more day till school reopens. Honestly, I am kinda looking forward to going back to school because staying at home all day is BORING and you know, I can’t possibly bake everyday because I will get damn fat after that. Oops
However, I think it is nice to share with you this Red Velvet Cupcake I had make before. Its so darn delicious. Fluffy, Soft and yum! It’s even better than the Red Velvet Cream Cheese Cake I ate at the 5 star hotel. [Yup, 5 star hotel…..]
This cupcake is so darn good because
- One of my friend said that this got to be the best thing I have baked for her
- It is beautifully coloured (artificially coloured but still, it didn’t bleed like the one I ate at the restaurant)
- It’s made with love! ❤

I got these cupcakes recipe for Sallysbakingaddiction. She’s the reason why I started baking and I love her so much!
So here’s the recipe:
RED VELVET CUPCAKES
- 2 large eggs, room temperature and separated
- 1 and 1/3 cups (160g) all-purpose flour
- 1/4 cup (32g) cornstarch
- 1/2 teaspoon baking soda
- 4 teaspoons (6g) natural unsweetened cocoa powder
- 1/4 teaspoon salt
- 1/4 cup (60g) unsalted butter, softened to room temperature
- 1 cup (200g) granulated sugar
- 1/2 cup (120ml) canola or vegetable oil
- 2 teaspoons vanilla extract
- 1/2 teaspoon distilled white vinegar
- liquid or gel red food coloring
- 1/2 cup (120ml) buttermilk, room temperature
CREAM CHEESE FROSTING
- 8 oz (224g) full-fat cream cheese, softened to room temperature
- 1/4 cup (60g) unsalted butter, softened to room temperature
- 2 cups (240g) confectioners sugar
- 1-2 Tablespoons (15-30ml) cream or milk
- 1 teaspoon vanilla extract
Directions:
- Preheat oven to 180°C. Line a 12-count muffin pan with cupcake liners.
- Make the cupcakes: With a handheld or stand mixer fitted with a whisk attachment, beat 2 egg whites on high speed in a medium bowl until soft peaks form, about 2-3 minutes.
- Sift the flour and cornstarch together to make sure it is evenly combined. Whisk this, along with baking soda, cocoa powder, and salt together in a medium bowl. Set aside.
- Using a handheld or stand mixer fitted with a paddle attachment, beat the butter on high speed until smooth and creamy – about 1 minute. Add the sugar and beat on high speed for 2 minutes until creamed together fairly well. Scrape down the sides and up the bottom of the bowl with a rubber spatula as needed. Add the oil and beat on high for 2 minutes.
- Add 2 egg yolks and the vanilla. Beat on medium-high speed until combined. Scrape down the sides and up the bottom of the bowl with a rubber spatula as needed. Beat in the vinegar and the food coloring– until you reach your desired color
- With the mixer on low speed, add the dry ingredients in three additions alternating with the buttermilk, beginning and ending with the dry ingredients, and mixing each addition just until incorporated. Do not overmix.
- Fold whipped egg whites in three batches into cupcake batter with a rubber spatula or wooden spoon. The batter will be silky and slightly thick.
- Spoon batter into cupcake liners filling 1/2 – 2/3 of the way full. Bake for 20-21 minutes or until the tops of the cupcakes spring back when gently touched and a toothpick inserted in the center comes out clean.
- Don’t overbake; your cupcakes will dry out. Allow to cool in the pan for 5 minutes, then transfer to a rack to cool completely.
Make the frosting:
- In a medium bowl using a handheld or stand mixer fitted with a paddle attachment, beat the cream cheese and butter together on medium speed until smooth, about 2 minutes. Add the confectioners’ sugar and 1 Tablespoon cream. Beat for 2 minutes. Add the vanilla and 1 more Tablespoon cream if needed to thin out. Beat on high for 1 full minute. Taste the frosting and add a pinch of salt if too sweet. Frost cooled cupcakes immediately before serving.

Glorious Sweet Potato Bread
Glorious Purple Sweet Potato Honey Bread. Full with nutrients and goodness.
Introducing to you: The glorious sweet potato bread! Sweetened with honey and filled with the nutrient packed sweet potato! Not forgetting the fabulous purple hue it produces!
The bread recipe was obtained from Xiachufang and the sweet potato filling was adapted from Vintage Trinket. However, the sweet potato was not as sweet as I would like but it is also because I did not add any sugar inside, making it even healthier and wholesome. Minimum butter was add in to make it more creamy and that’s all.
A nutrition filled breakfast for everyone and for everyday! Yum! 


Recipe for Bread:
- 200g bread flour
- 50g cake flour
- 55g honey
- 2.5g salt
- 3g yeast
- 125g milk
- 35g egg
- 25g unsalted butter
- Mix all the ingredients except butter together till windowpane stage is achieved. Knead after the dough is soft and smooth. It may be really sticky at first but do not be tempted to add more flour, but rather, continue to knead the dough. Add the butter till it is incorporated.
- Let it rise till it is doubled. (Mine took 1hr)
- Punch the dough down and divide it into 10 portions.
- Let it rest for 10 minutes.
- Shape the dough and fill it up with the sweet potato filling.
- Let it rise for a second time
- Bake at 180 degrees for 20 minutes or till it is hollow when tapped.
- Devour
Sweet Potato Filling:
- 200g mashed and cooked sweet potato
- 20g unsalted butter
- pinch of salt
- some milk
- Add the butter into the hot mashed sweet potato and mix well until the butter melts.
- If the mixture is too dry, add some milk to lighten it up.
- Set the filling aside to cool.
Enjoy 🙂

Lemony orangy Lemony Cake
Hello guys!
Presenting to you one of the loveliest cake with the best crust, that can be eaten plain on its own or use it to assemble a layer cake.
It is full with citrus flavours, and most importantly, it is not overly sweet! The crust on top, oh gosh, I can eat this all day, for breakfast, for lunch and for dinner and for supper. This cake was the main cake component for my friend’s birthday cake, and I would have to admit, this is the best part of the whole cake, because my lemon curd failed and my buttercream, failed even more badly.
However, this cake saved the whole cake. Yes, it did! ❤ It was really easy to make and the texture was just spot on! It was even better than the blueberry lemon cake layers I baked last time, and this definitely have lesser ingredients!
This cake layer is adapted by April Charter ‘Decorated’. There are so many recipes inside that I would like to try out and I hope you do as well! I am sure you will love this cake as much as I do!
Here’s the recipe (Makes 4x6inch cake layers)
- 225g unsalted butter
- 225g granulated/ caster sugar (it was previously 310g sugar)
- 4 medium eggs (lightly beaten)
- 300g plain (all-purpose) flour
- 2.5 tsp baking powder
- 1/4 tsp salt
- 120ml milk
- Zest of 2 lemons and 2 oranges
- Preheat the oven to 170 degrees celcius. Grease 2 6inch cake tins and line the bases with baking parchment.
- Using a electric hand mixer or stand mixer, cream the butter and sugar for 3-4 mins (I beat it for 3mins) till it is light and fluffy.
- Add the beaten eggs a little at a time, beating after each addition, until they’re well incorporated. I like to beat slightly longer after adding the last bit of egg so that the mixture can be slightly more fluffy (Approximately 20 seconds)
- Sift the flour, baking powder, and salt into a clean bowl. Add half of the flour mixture to the butter mixture and beat until just combined.
- Add the milk, continuing to beat and then add the remaining flour mixture and the zest and beat until just combined.
- Divide the mixture evenly between the prepared cake tins. Bake in the over for 45-50 minutes (mine took 50 minutes) or until a skewer inserted into the centre comes out clean.
- Allow the cakes to cool for 10 minutes in their tins, then turn them out onto a wire rack and leave to cool completely.


Look at the crust! Oh My Goodness!

Argh So hotttttt
Eating Tang Yuan marks the end of the 15th day of Chinese New Year. Eating Tang Yuan symbolizes 团团圆圆, which also mean a family staying close together. However, jiejie has flown back to Aussie and since the family is not 4/4, we have decided to skip eating Tang Yuan….
Till……
I suggested eating black ball. Wells, the pearls are round… The yam glutinous balls are round, sweet potato balls are round, we are still revolving around the topic of round right? Well, I have tried this many many times and I still love it. The sweet icy winter melon topped with grass jelly and aiyu jelly and other topping, oh gosh! This is way better than a $18.90 Bingsu which is bland and simply put, you are just paying for shaved milk… Both Mama, Papa and I agree that we would rather eat ice but with something that has more toppings and more flavourful and something that is more than half of the price.
The lightning makes this picture looks extremely beautiful and simply make the whole bowl of goodness shines through. Yum! Perfect for such a hot weather in Singapore!
 Loving it <3<3

Soft Pumpkin Bread (17hr fermentation)
Revealing to you:
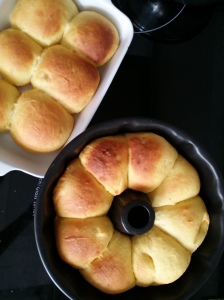
The ultimate soft soft soft soft soft pumpkin bread that still stays soft soft soft soft soft after the 2nd day. Saw that dent? It happened because I was trying to remove it from the pan and it was too soft, thus disfigured! Haha! I baked this pumpkin bread very long ago but did not have the time to post the recipe up and it has been quite a while since I last posted something. hehe, gonna spam posts now!

Let’s talk about this bread. You have to plan your time carefully if you want to bake this cake. All the fermentation and stuff, you gotta think when you wanna do it yea! But, despite all that hassle, it is all worth it.
This is a recipe which I have gotten from Honeybeesweets which she has adapted it from 孟老师! However, she has scaled her recipe by 1.5 times, therefore, she was able to make a loaf and 4 buns out of it! I feel that it was a little bit too much for me because it was too much, therefore, I strongly advise you to scale the recipe down if you are making for a small family like mine! Please enjoy!
Pumpkin pre dough:
150g pumpkin, peeled, steamed and pureed
30g bread flour
105ml water
In a heatproof sauce pan, add in all the above ingredients, mix well until all is combined. Then start the fire and cook the mixture till it thickens, about a couple minutes. Let cool completely then store in container and chill in fridge for up to 8 hours before use.
Main Dough:
All of the above pre dough
450g bread flour
60g caster sugar
3/4 tsp salt
6g active dry yeast (1.5tsp)
170ml fresh milk (you can start with 150ml and add as per needed)
35g unsalted butter, room temperature
- In a heavy duty mixer, add in all the above ingredient except the butter and knead everything together to form a soft pilable dough. Continue to knead/mix till the dough is not sticky, then add in the butter. Knead well till it reaches elastic and window panel stage. It took me about 20 to 25 minutes on my KA mixer at medium speed with 2 times of 2 minutes break in between.
- Let the dough proof in a well greased bowl for about 1.5hr to 2hrs or until it has doubled its size.
- Punch out the air and divide the dough in 600g and 4x70g or approximation to the weight you have with the dough. Shape the 600g portion for a loaf while the 4x70g portions for buns.
- Shape as desired, top with desired filling for buns and let proof for another 45mins. Preheat the oven to 180C while proofing.
- Glaze the dough tops with egg wash and bake in the oven for 28-30 minutes for loaf while 14 minutes for buns.
- Once done, remove from oven. Remove the loaf from the pan after 3 minutes and let cool completely before slicing.
Enjoy!
