Milo Cupcakes with condensed milk frosting

SAM_9934

Creamy milk frosting. 

Milo flavoured cupcake. 

Heaven and Earth. Perfect Combination.

Presenting to you,

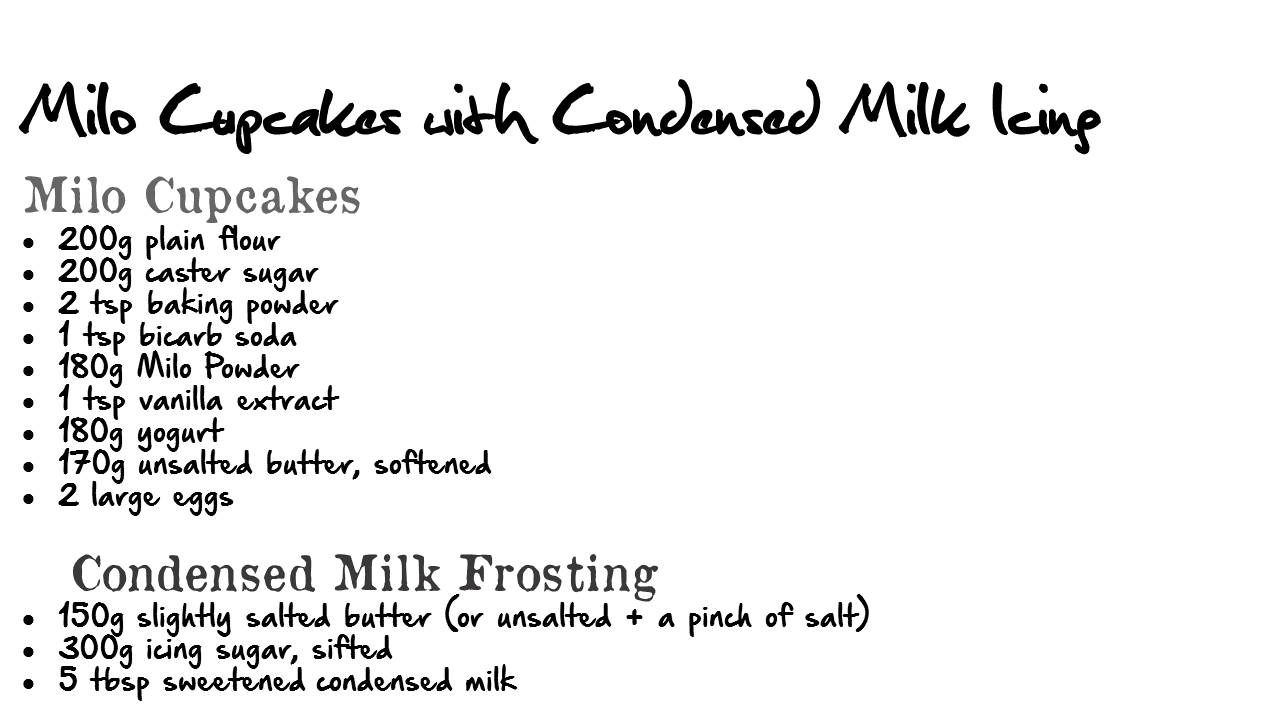
Milo cupcakes with condensed milk frosting. These cupcakes are definitely not healthy. Hehe but they definitely taste good though there is of course, room for improvement.

I baked these cupcakes for my teammates who are going to start their Top 8 competition for the Nationals. Oh My Goodness, they are really awesome right? They have worked really hard and I really hope that they can achieve their Top 4 dream. As I can’t participate in any sports currently, the best that I can do for them is to spur them on with cupcakes. I added Milo which is supposed to be an energizer so that they have more energy to jump high, spike harder and set perfectly.

I was at first skeptical about the frosting but it came out delicious. I could not resist it myself too! As for the milo cupcakes, the taste of the milo wasn’t very strong. Should have increased it to 150g instead of 120g. Highly recommend everyone to use 150g next time!

As for the sugar, I reduced the sugar in this recipe from 200g to 180g. It is only 20g and I don’t think it affected alot. Maybe try adjusting it to your own preference. I guess people still like sweet cupcakes which give it the essence? I don’t know. Haha

The frosting wasn’t meant to be shaped like the picture. It was supposedly to be frosted into a beautiful rose but guess what? I ran out of icing sugar and I added a bit more sweetened condensed milk because it was tasteless at first and tadaaaaa. I didn’t had enough icing sugar to thicken it up but oh wells.

I adapted this recipe from http://www.raspberricupcakes.com/2010/05/milo-cupcakes-with-condensed-milk-icing.html

I’m glad that most of them like it and I will continue to improve on my cupcakes.
SAM_9933 SAM_9924 SAMSUNG CSC See how beautifully they have rose. For the first time, my cupcakes rose perfectly!

Slide1 Slide2

Enjoy:)

Peanutty-Sesame Donuts

Presentation1

Black Sesame Totoro Donuts Photo Courtesy of Iamafoodblog

Screaming.  DONUTS

Donuts have been my childhood snack and everyone loves them. Light and fluffy for the interior, paired with the sweet icing sugar on the outside.   ‘Life is like a doughnut. Inevitably, there will be a missing parts, yet it is still perfect and beautiful’.

These traditional chinese donuts are very different from Krispy Kreme topped with the glazed icing sugar. Though I have never tried Krispy Kreme, I tried before J.CO donuts, Dunkin Donuts and I don’t find them extraordinary. They are basically just plain donuts topped with flavoured icing and they cost exorbitantly expensive. I will never treat myself to one though but I will treat others. Haha

As I was reading through IamAfoodblog, I stumbled upon her Totoro Black Sesame Donut and was inspired but it. Imagine, sesame! I love sesame. Nutty, deep, and full of flavours. I tried to be creative and added some roasted crushed peanuts as well. Oh my. Another level. This recipe is definitely a keeper 🙂

s

肉干饼干 aka Bak Kwa Cookies

Bak Kwa is here!

What’s CNY without the most well-loved Bak Kwa? 肉干是新年必须买的。虽然它三百六十五天都能买到,但是,在这个节日吃,就是有一种不同的感觉,不同的感触。我也不知道为什么。

上网时,看到了Anncoo Journal 的 Bakkwa Cookies, 觉得挺特别的,所以索性试试看。我觉得饼干有点太酥,有点像入口即化的感觉。但是吃饼干的时候能咬到肉干,感觉挺爽的。

Recipe adapted from: http://www.anncoojournal.com/2012/02/bak-kwa-cookies.html

  • Surprise bites in every bite
    Surprise bites in every bite

    125g softened unsalted butter

  • 35g icing sugar
  • 30g small egg (beat an egg and weigh out 35g)
  • 1/4 tsp vanilla
  • 200g plain flour
  • 70g Bak kwa chopped into small pieces
  1. Cream the butter and icing sugar on low for 1 minute,  before creaming it at medium high speed for 5 minutes.
  2. Add in the egg and cream on low for 1 minute.
  3. Add in the vanilla and cream for a few seconds.
  4. Pour in the flour and let it beat on low till a dough is formed.
  5. Using a spatula, fold in the chopped bak kwa.
  6. Cover the dough with a cling wrap and let it chill for 30 minutes.
  7. Bake at 180 for 16-18 minutes or till golden brown.

Happy Baking 🙂

黄梨酥饼

新年快乐

Happy Chinese New Year. Chinese new year means baking CNY goodies and this is my first. Pineapple tarts 🙂

黄梨means ‘Ong Lai’ in hokkien, which symbolizes 旺. Everybody will eat pineapple tarts during Chinese New Year. Though they are really rich in flavor, it is however, very fattening with all the butter and sugar used. However, once in a while indulgence is alright and is okay. Shhhh, don’t tell anyone.

This is the second time I made pineapple tart, with the recipe provided by Sonia from http://nasilemaklover.blogspot.com/. The tart is melt-in-your mouth type, yet it is not well-liked by my relatives who afterall, prefer the crunchy biscuity type to this crumbly version. Hence, next time, I will find the perfect biscuity type version to the pineapple tarts.

Pineapple Tarts

For the pastry, I used

  • 175g butter 
  • 50g condensed milk
  • 255g All purpose Flour
  • 1 egg yolk of a large egg weighing 55g each.
  1. First, cream the butter and condensed milk on low speed for 1 min.
  2. Increase the speed to medium high and cream for 5 minutes till it is light and fluffy.
  3. Add in the egg yolk and cream at low speed for another 1 minute till egg yolk is incorporated.
  4. Add the flour and cream at low speed till a dough is formed.
  5. Cover the dough and chill for 15 minutes.
  6. Cut out the desired shape using your cookie cutter
  7. Put the cut out cookies back into the fridge for another 15-30 minutes till it is hard.
  8. Bake at 170 degrees till it turns light and golden. My oven took 30 minutes, rotating twice.

Happy Baking 🙂